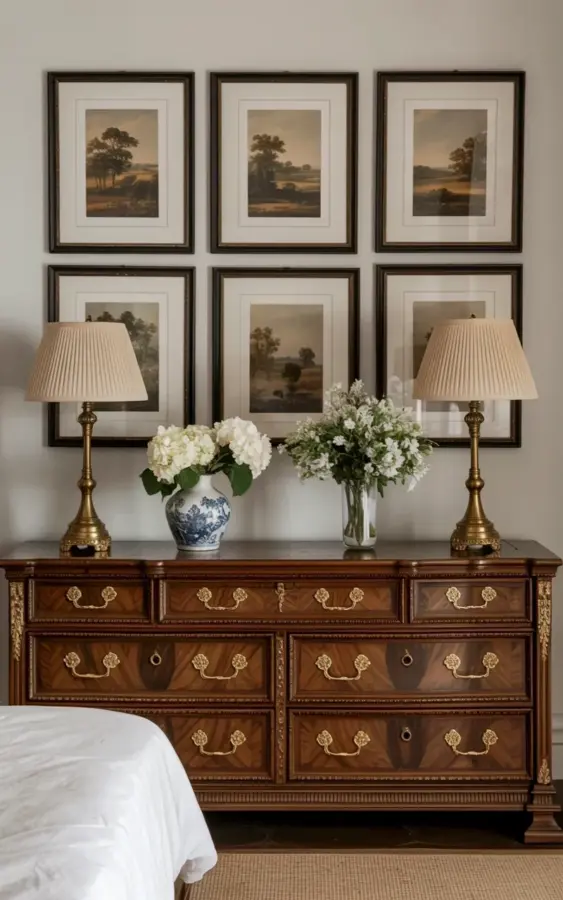
You have seen the photo, right? The one where a moody, dark wooden dresser sits under a perfect grid of sepia landscape prints, while two brass lamps glow like little beacons of sophistication. That beautiful setup can be recreated on a budget home office decor plan without blowing your paycheck. In fact, the secret to that entire look is patience, a few thrift store trips, and a determination to avoid the beige and grey trap that plagues modern workspaces. You can do this.
The room in the photo feels like it has history, like it has been there for fifty years, and that is exactly what we are chasing here. We want a space that whispers classic taste, not one that screams “I just bought everything from a single online catalog.” This guide is for the absolute beginner, the person who thinks they have zero decorating instincts. Trust me, if you can hang a picture and screw in a lightbulb, you can build this whole vibe. Let’s just take it one step at a time.
Why a Vintage Dresser Beats a Generic Desk for Your Office
Look, a modern desk is fine, but it is rarely interesting. A vintage dresser, on the other hand, brings a physical weight and character that a flimsy table just cannot fake. In the photo, that dark brown burled wood with the ornate brass hardware is the anchor of the entire room. It adds a sense of permanence and luxury that you cannot paint over. Using a dresser as a desk also means you get storage, so those messy piles of paper and cables have a place to hide. You shut the drawer and your office looks clean immediately. That is a huge win for concentration.
Most vintage dressers have a wide, flat top which is perfect for a monitor or a laptop. The depth of the drawers is often deeper than you think, which means you can store everything from office supplies to old tax documents. If you are buying one, check for dovetail joints and solid wood construction. A piece from the 1960s or earlier will usually outlast anything you can buy at a big box store today. And honestly, a coat of dark wood polish brings the finish back to life really quickly.
Building a Gallery Wall of Sepia Landscapes Without Designer Prices
Now for the real star of the show, that 2×3 grid of black-framed prints. It looks expensive, but it is actually one of the easiest things to source on a budget. The trick is consistency; all the frames need to be black and all the art needs to have that sepia or muted brown tone. You are not looking for loud, colorful canvases. You are looking for quiet, pastoral scenes, trees, rolling hills, fields, maybe an old barn, calming imagery that makes you feel like you are working from a countryside estate.
Here is what you need to do:
– Hit up thrift stores and estate sales for the frames first, not the art. Often you can buy a framed print you hate just for the frame.
– The painting inside is irrelevant if the frame is good. Take the ugly art out and keep the frame.
– Search online for “vintage landscape etching” or “sepia pastoral print” in the public domain. Museums offer free high-resolution downloads of old artwork.
– Print the images on matte paper at your local print shop or at a FedEx Office. It costs pennies compared to buying actual art.
– Mix up the matting. Some frames have white mats, some have cream, but keep the frame color uniform to hold the grid together.
The grid formation is what makes it look intentional. A 2×3 grid is formal and symmetrical, which matches the traditional lines of the dresser. When you hang them, use a level and measure the gap between each frame to keep it exactly even. That precision is the difference between a classy gallery wall and a chaotic mess.
Lighting: Finding Brass Lamps That Look Like Heirlooms
Lighting is where you make or break the “expensive” feeling. Those two matching brass table lamps with cream pleated shades do a lot of heavy lifting in the reference photo. They flank the artwork and cast a warm, flattering glow upward, highlighting the texture of the prints and the wood grain. You can often find brass lamps for five dollars at a garage sale, but the shades are usually the problem. Don’t worry, a new pleated shade is easy to order or find at a craft store.
Make sure you use warm bulbs, not the harsh white LED ones that make everything look like a hospital. A 2700K to 3000K bulb will give you that amber glow. Symmetry matters here; you want the lamps to be identical in height and style. If you find two that are close but not perfect, you can always spray paint the bases to match, but that is a bit more advanced. Just keep walking the thrift store aisles, two matching lamps show up eventually with some persistence.
Dark Wood and Brass: The Color Formula That Feels Expensive
The reason this budget home office decor works so well is the color palette. It is dark, moody, and cohesive. You have the deep umber of the wood, the matte black of the frames, the soft gold of the brass, and the neutral cream of the lamp shades. That is the whole recipe. If you use a light wood desk, the whole vibe changes, it becomes farmhouse or Scandinavian, which is nice, but it is not this. Do not mix in silver metals here; stick to brass or gold tones for the hardware.
Let me tell you, getting this right is a balance. It took me forever to find a dresser that didn’t have damaged veneer on top, and honestly, I almost gave up and bought something new. But the moment I put the lamps on, everything clicked. The dark wood makes the room feel grounded. It absorbs the light rather than bouncing it around, which creates that intimate, focused atmosphere you need for deep work.
A Step-by-Step Plan for the Complete Beginner
If you are starting from scratch with absolutely nothing, do not panic. Here is the beginner-friendly order of operations to get you to the finish line without wasting money.
1. Measure your wall space first so you know how big your grid should be.
2. Find the dresser. Look under “desk” searches on Facebook Marketplace, but set the filter to “antique furniture” or “dresser” to get better results.
3. Clean and polish the wood. Use a product specifically for wood, not a generic all-purpose cleaner.
4. Source the six frames. Remember, you only need three, but you will hang six, so keep hunting until you have enough.
5. Select and print your art. Keep the images in the same sepia family, this is not the time for a random black and white picture of a city.
6. Assemble the frames and hang the grid.
7. Put the lamps on the dresser, plug them in, and adjust the shades.
That is the whole process. It is not a race. You can spread these tasks across a few weekends. Some of the best finds happen when you are not even looking for them.
Making This Work in a Small Space or a Rental
You might be thinking, “This looks great, but my office is a tiny corner in the living room.” That is fine. A gallery wall over a dresser works almost anywhere you have a blank wall. If you are renting and worried about damaging the walls, use a picture hanging system that requires only a couple of nails, or use heavy-duty command strips for the frames if they are lightweight enough. The dresser itself is just furniture, so you can move it whenever you like.
One more thing, if your room is small, this dark furniture will make it feel cozier. Some people think that dark colors shrink a room, but with the right lighting, it actually wraps the walls in warmth. Just make sure the lamps are strong enough to light up the work surface. You do not want to strain your eyes trying to read documents in the gloom.
So, take a Saturday to look at what you already have. Maybe you have a family heirloom dresser in the garage, or maybe you have a couple of old frames waiting for new life. This style is timeless for a reason. It feels substantial, considered, and personal. Start small, gather your pieces, and love the process. I bet once you get this corner looking right, it becomes your favorite spot in the house. Good luck, and have fun hunting for that perfect dresser.
Leave a Comment