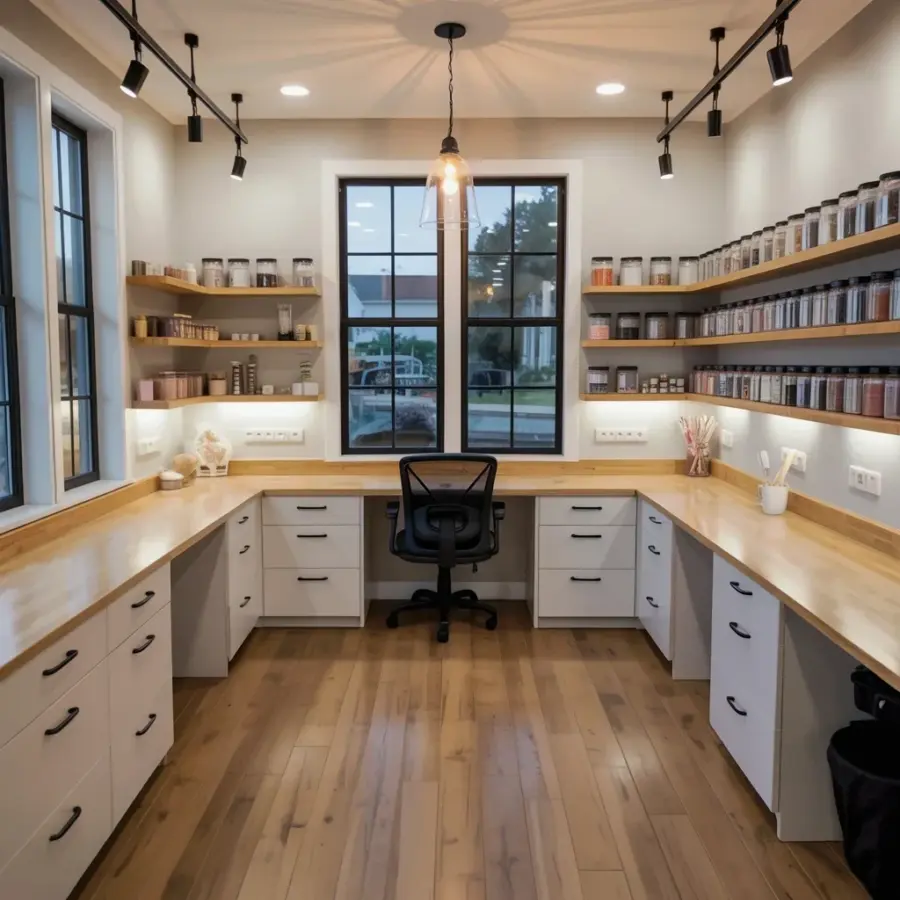
The deadline for that work project and the half-finished scrapbook are about to stage a coup on your dining table. You need a home office craft room combo, not because some design blog told you to, but because your living space is currently fighting itself. A wrap-around desk setup is the only practical way to give both your laptop and your cutting mat a permanent home without sacrificing your sanity or your morning coffee spot.
The trick isn’t just buying a big desk. It’s zoning. It’s building a physical and mental border between the “must do” side and the “want to do” side. I’ve spent three weekends messing with this exact layout in my own cramped spare room. Here’s how you can map it out in one weekend, minus the frustration.
Measure Your Space and Map Two Distinct Zones
Before you buy a single bracket or board, sit on the floor of your chosen room and look at the walls. Actually sit there. It changes your perspective on how much vertical space you’re wasting. You need to identify two separate work triangles: one for your computer tasks and one for your hands-on projects. These zones can exist on the same continuous desktop, but they need a clear visual break.
Grab a tape measure and a roll of painter’s tape. Mark out the office area and the craft area on the floor so you can visualize the walkway. Remember that you need about 36 inches of clearance behind your chair to push back without hitting a shelf unit. And look, if your room is a weird shape like mine, don’t stress. The wrap-around aspect means you’re using corners that would normally be dead space anyway.
The office zone needs:
– Easy access to power outlets for your monitor and laptop
– A flat, stable surface for writing and a mouse pad
– Your router or ethernet cable within reach
– A spot for a coffee mug that isn’t in your way
Your craft zone needs deeper counter space for machines, better task lighting, and a spot for a trash bin. These zones should not share a pencil cup, I promise you that.
A Wrap-Around Desk Creates a Natural Workflow During the Week
The beauty of a corner desk that wraps is that you can turn your chair 90 degrees to switch tasks instead of walking to another room. That sounds lazy, but honestly, it’s the difference between actually using your hobby space and letting it become a dumping ground. When you finish a Zoom call, you spin your chair, plug in the glue gun, and you’re already in your happy place. No transition time means no excuses.
I built mine using two 60-inch butcher block countertops from the hardware store. One side is slightly lower for typing, the other is standard counter height for standing while I cut fabric. That height difference is a game-changer. It physically breaks the line of the room and tells your brain, “hey, new task now.” You don’t need custom cabinets. You just need a few heavy-duty L-brackets and a stud finder.
If you have a window, position the wrap so it hugs the corner facing the glass. Natural light is a privilege that makes both answering emails and painting miniatures infinitely better. If you’re stuck with an interior wall, invest in a daylight-balanced lamp for the craft side. There’s nothing worse than trying to match thread colors under a yellow bulb.
Storage Strategies That Work for Paper and Fabric
The biggest lie about craft rooms is that you need to see everything you own. You don’t. You need to see the current project, and you need everything else to be invisible but accessible. Use the vertical space above your wrap-around desk for shallow shelves. Hide stacks of patterned paper in magazine files, and sort ribbon by color in clear glass vases or mason jars.
For the office side, a simple floating shelf keeps reference books off your desk surface. For the craft side, install a pegboard. It looks cute, but it’s mostly functional for hanging scissors, rulers, and rolls of washi tape. The goal is to keep the corners clear so you can actually use the desk to make things, not just store things.
Consider a rolling cart for your most-used tools. I have one that lives under the craft side of the desk. When I need to sew, I roll it out and put my machine on top. When I’m done, it slides back into the shadows. The key is specific homes for specific items. Junk drawers are how creative workspaces die.
Power Management and Cable Hiding for a Clean Look
You’ll have two computers, a printer, a lamp, a phone charger, and possibly a Cricut all fighting for the same duplex outlet. Go ahead and buy a surge protector with USB ports, but don’t just plug it in and let it dangle. Mount it under the desk with adhesive clips so you can reach it but never trip over it. This is the least glamorous part of the setup, but it’s the difference between a workspace and a tangled mess.
Use adhesive cable raceways along the back edge of the wall to run wires down to the floor. Bundle your cords with velcro ties, not zip ties, because you’ll need to unplug stuff eventually. Feeling the satisfaction of a clean underside is weirdly motivating. It makes you want to keep the top clean too, at least for a week or two.
Lighting Is the Unsung Hero of the Combo Room
Overhead lighting is the enemy of a good workspace. It casts shadows on your work, and if you’re anything like me, you’ll end up squinting at your screen or your cross-stitch. Get a dedicated articulating arm lamp for the craft zone that you can pull down close to your hands. On the office side, use a bias lighting kit behind your monitor to reduce eye strain during those long afternoon slogs.
If you’re on a budget, look for clip-on lights with metal shades. They’re cheap, adjustable, and they don’t waste space on the desk. Just make sure your bulbs are high CRI. That means the colors look true, which is essential if you’re painting or picking fabric. I learned this after painting a wall piece that looked gray in my studio and turned out blue in the daylight. Not my finest moment.
A Weekend Project Plan to Build the Desk Frame
Here’s the thing: you don’t need a complicated plan. You need a simple base cabinet, a couple of drawer units, and a solid countertop. Skip the fancy adjustable legs unless you have a standing desk obsession. Get two tall shelf units and use them to support the desk surface on either end. This gives you tons of storage and a desk base in one move, you just have to make sure they’re the same height.
Cut your butcher block to fit the corner angle if you want a true L-shape, or just butt two rectangles together with a metal bracket underneath. I used a router to round the front edge because sharp corners bruise your forearms after a long day. For the center support, a simple steel pole that goes from the floor to the underside of the desk provides that stability you need if you’re leaning heavily on a cutting mat.
Screw the base into the wall studs. Don’t skip this. A desk that wobbles will ruin your focus and your drafting skills. Once it’s sturdy, give it a good coat of polyurethane or wax. You’ll spill coffee and paint on it, so protect your work.
Beyond the Desk: Finishing Touches That Keep You Creating
The final step is making the space feel like a place you want to be. Don’t hang generic motivational signs. Instead, pin up your current inspiration board, a swatch of fabric you love, or a photo of a project you want to try. On the office side, keep a small plant or a photo of your family to remind you who you’re working for.
Set a rule with yourself about “closing time.” When the workday ends, shut the laptop and slide it into a drawer. This physical action signals to your brain that your craft time has begun. If you leave the laptop open, you’ll just check emails between hot glue gun passes.
Anyway, map your zones, build your wrap-around, and give those hobbies the space they deserve. A room that works for both halves of you is worth a weekend of sweat.
So, what’s going in your craft zone? I’m genuinely curious about your project stash and the weird corners of your space. Drop a comment below.
Leave a Comment