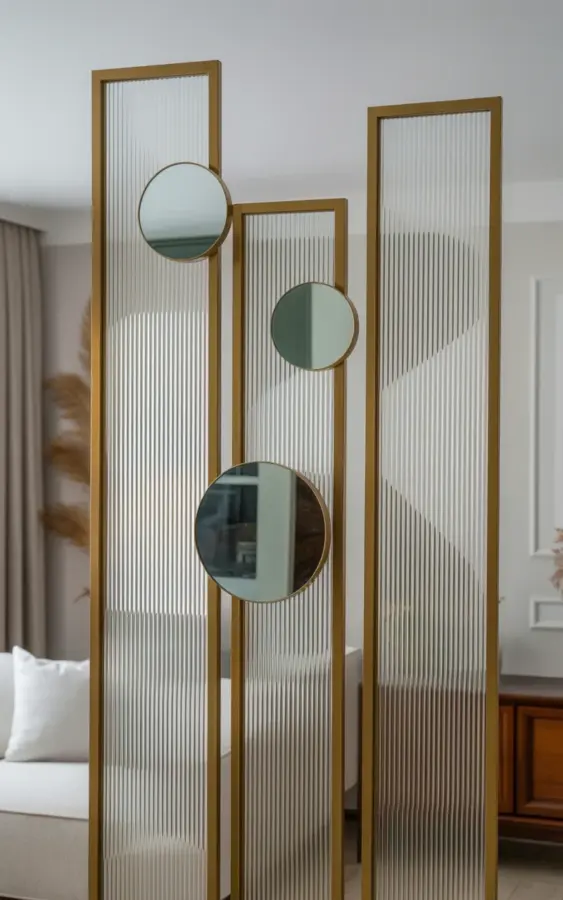
Why Ribbed Glass Home Office Wall Panels Work for a Budget Makeover
When I first saw a photo of a sleek home office with ribbed glass home office wall panels in staggered formation, I assumed the look came with a designer price tag. But after some digging, I found that this elegant texture-and-light effect is surprisingly accessible. The key is knowing where to find affordable panels and how to install them without hiring a carpenter. That vertical ribbed texture, paired with warm gold frames, turns a plain white wall into something that feels custom and curated.
The photo that inspired this article shows three tall vertical panels, each with that distinctive etched ribbing, arranged in a staggered line. Between and above them hang small circular gold-framed mirrors. The whole setup catches light and creates a linear wave effect. It feels sophisticated without being fussy, and it works beautifully in a home office where you want a professional backdrop for video calls.
Affordable Sources for Gold-Framed Ribbed Glass Panels
Real gold frames are expensive, but you don’t need them. Look for brushed brass or gold-toned aluminum frames. Many online retailers sell ready-made ribbed glass panels with lightweight metal frames starting around $80-$150 per panel for standard sizes. I’ve seen similar ones at home improvement stores in the decorative wall panel section. The trick is to search for “fluted glass panels” or “reeded glass wall decor” because those terms often turn up budget-friendly options.
- IKEA carries a few ribbed glass cabinet doors that you can repurpose as wall panels (just add a simple gold frame yourself).
- Etsy has handmade panels with brass frames, but prices vary. Look for sellers who offer raw glass panels and frame them yourself to save.
- Amazon has peel-and-stick ribbed glass panels that mimic the texture. They’re thinner but work for a temporary or renter-friendly setup.
If you’re handy with a miter saw, you can buy plain fluted glass sheets and build gold-painted wooden frames around them. That approach cuts costs by more than half. Just make sure the glass is tempered for safety.
How to Achieve the Staggered Vertical Panel Look on a Budget
The photo shows three panels placed at slightly different heights. This staggered arrangement breaks up the monotony of a straight line and feels more like art than a wall treatment. To copy it without expensive measurements, mark the center of each panel’s top edge on the wall and then adjust by a few inches up or down. You don’t need perfect symmetry; a 6-8 inch stagger between panels looks natural.
I recommend using heavy-duty picture hangers or French cleats rated for the weight of the glass and frame. A single panel can weigh 10-15 pounds. If you’re renting, use adhesive strips designed for mirrors, but test them on an inconspicuous spot first. The circular gold mirrors in the photo sit between and above the panels, filling the negative space. You can buy those for under $20 each on major retail sites. Look for “gold round mirror” and pick a size that fits the gap, typically 10-14 inches in diameter.
Light Reflection and Texture Without Breaking the Bank
Ribbed glass does two things simultaneously: it adds subtle texture that feels soft rather than aggressive, and it bounces light around the room. In a home office, that means your face gets flattering, diffused lighting during video calls. You don’t need expensive studio lights. The panels act like low-key reflectors. I positioned a small desk lamp to shine toward the wall, and the ribs scattered that light into a gentle glow.
If you can’t find actual ribbed glass, consider acrylic sheets with a fluted pattern. They’re lighter, cheaper, and still create that linear wave effect. Some office supply stores sell acrylic privacy panels that can be cut to size. Spray-paint a simple wooden frame with a metallic gold finish, and you have a convincing alternative. The texture won’t be as crisp, but from three feet away, it looks nearly identical.
Pairing Circular Mirrors with Glass Panels for Depth
Those small gold-framed mirrors in the photo are more than just decor. They break up the vertical lines and add circular movement, which makes the wall feel less rigid. I hung mine at different heights to echo the stagger of the panels. One mirror sits slightly above the tallest panel, another nestled between two panels. The reflection of the ribbed glass multiplies the texture, so you get a layered effect for almost no extra cost.
A smart tip is to choose mirrors with a similar gold tone to the frame, not an exact match. A slight variation in gold finishes (one more brass, one more champagne) gives a collected-over-time look. Avoid mirrors with bulky black or silver frames; they’ll clash with the warmth of the gold. For a budget option, check discount home goods stores. I found a three-pack of small gold round mirrors for $25 that worked perfectly.
Practical Installation Tips for Renters and Homeowners
You can install these panels in an afternoon with basic tools. For drywall, use toggle bolts or molly anchors. For plaster, a masonry bit and hollow wall anchors are safer. Measure twice before drilling because glass panels don’t hide mistakes. If you’re uncertain, lay the panels and mirrors on the floor against the wall to test your layout first. Tape outlines on the wall with painter’s tape as a guide.
Temporary adhesive options include command strips for lightweight acrylic panels (up to about 5 pounds) or museum gel for the mirrors. But heavy glass
#HomeOfficeDecor #RibbedGlassPanels #GoldFrames #ModernWallDesign #InteriorInspo